This is the blog section. Files in these directories will be listed in reverse chronological order.
News
Introducing SpinKube
Bringing the next wave of hyper-efficient serverless to Kubernetes.
Today we’re introducing SpinKube - an open source platform for efficiently running Spin-based WebAssembly (Wasm) applications on Kubernetes. Built with love by folks from Microsoft, SUSE, LiquidReply, and Fermyon.
SpinKube combines the application lifecycle management of the Spin Operator, the efficiency of the containerd-shim-spin, and the node lifecycle management of the forthcoming runtime-class-manager (formerly KWasm) to provide an excellent developer and operator experience alongside excellent density and scaling characteristics regardless of processor architecture or deployment environment.
TL;DR? Check out the quickstart to learn how to deploy Wasm to Kubernetes today.
Why Serverless?
Containers and Kubernetes revolutionized the field of software development and operations. A unified packaging and dependency management system that was flexible enough to allow most applications to become portable - to run the same versions locally as you did in production - was a desperately needed iteration from the Virtual Machines that came before.
But while containers give us a relatively light weight abstraction layer, they come with a variety of issues:
- Change management - patching system dependencies (such as OpenSSL) need to happen on every image independently, which can become difficult to manage at large scale.
- Rightsizing workloads - managing access to shared resources like CPU and memory correctly is difficult, which often leads to over-provisioning resources (over introducing downtime) resulting in low utilization of host resources.
- Size - containers are often bigger than needed (impacting important metrics like startup time), and often include extraneous system dependencies by default which are not required to run the application.
The desire to fix many of these issues is what led to the “first” generation of serverless.
Borrowing ideas from CGI, serverless apps are not written as persistent servers. Instead serverless code responds to events (such as HTTP requests) - but does not run as a daemon process listening on a socket. The networking part of serverless architectures is delegated to the underlying infrastructure.
First-generation serverless runtimes (such as AWS Lambda, Google Cloud Functions, Azure Functions, and their Kubernetes counterparts OpenWhisk and KNative) are all based on the principle of running a VM or container per function. While this afforded flexibility for application developers, complexity was introduced to platform engineers as neither compute type is designed to start quickly. Platform engineers operating these serverless platforms became responsible for an elaborate dance of pre-warming compute capacity and loading a workload just in time, making for a difficult tradeoff in cold start performance and cost. The result? A slow and inefficient first generation of Serverless.
To illustrate this point, below are all the steps required to start a Kubernetes Pod:
| Phase | Description |
|---|---|
| Kube init | Kubernetes schedules a Pod to a node, the node then prepares to run the Pod |
| Image pull (cacheable) | The node pulls the container images from a remote repository to a local cache when needed |
| Image mount | The node prepares the container images and mounts them |
| Container start | The node configures and starts the Pod’s containers and sidecars |
| Application load | Each container loads application code and libraries, and initializes application memory |
| Application initialization | Each container performs application-specific init code (entry-point, setting up telemetry, validating connections to external dependencies, etc.) |
| Pod ready | The Pod responds to the asynchronous readiness probe and signals that it is now ready |
| Service ready | The Pod gets added to the list of active endpoints for a Service and can start receiving traffic |
Optimizing this process and reducing the deplication that occurs on every replica (even when running on the same node) is where Spin the Wasm runtime and SpinKube start to shine.
Why SpinKube?
SpinKube solves or mitigates many of the issues commonly associated with deploying, scaling, and operating serverless applications.
The foundational work that underpins the majority of this comes from removing the Container. Spin Applications are primarily distributed as OCI Artifacts, rather than traditional container images, meaning that you only ship your compiled application and its assets - without system dependencies.
To execute those applications we have a runwasi based containerd-shim-spin that takes a Spin app, pre-compiles it for the specific architecture (caching the result in the containerd content store), and is then ready to service requests with sub-millisecond startup times - no matter how long your application has been sitting idle.
This also has the benefit of moving the core security patching of web servers, queue listeners, and other application boundaries to the host, rather than image artifacts themselves.
But what if you mostly rely on images provided by your cloud provider? Or deploy to environments that are not easily reproducible?
This is where runtime-class-manager (coming soon, formerly KWasm) comes into play - a Production Ready and Kubernetes-native way to manage WebAssembly runtimes on Kubernetes Hosts. With runtime-class-manager you can ensure that containerd-shim-spin is installed on your hosts, manage version lifecycles, and security patches - all from the Kubernetes API.
By combining these technologies, scaling a Wasm application looks more like this:
| Phase | Description |
|---|---|
| Kube init | Kubernetes schedules a Pod to a node, the node then prepares to run the Pod |
| Image pull (cacheable) | The node pulls the needed container images from a remote repository to a local cache when needed |
| Wasm Load (cachable) | The shim loads the Wasm and prepares it for execution on the node’s CPU architecture |
| Application start | The shim starts listening on the configured port and is ready to serve |
| Pod ready | The Pod responds to the asynchronous readiness probe and signals that it is now ready |
| Service ready | The Pod gets added to the list of active endpoints for a Service and can start receiving traffic |
Or in practice:
Deploying applications
This leaves one major area that can be painful when deploying applications to Kubernetes today: the developer and deployment experience.
This is where Spin, the spin kube plugin, and spin-operator start to shine.

The spin-operator makes managing serverless applications easy - you provide the image and bindings to secrets, and the operator handles realizing that configuration as regular Kubernetes objects.
Combining the operator with the spin kube plugin gives you superpowers, as it
streamlines the process of generating Kubernetes YAML for your application and
gives you a powerful starting point for applications.
This is all it takes to get a HTTP application running on Kubernetes (after installing the containerd shim and the operator):
# Create a new Spin App
spin new -t http-rust --accept-defaults spin-kube-app
cd spin-kube-app

# Build the Spin App
spin build

# Push the Spin App to an OCI registry
export IMAGE_NAME=ttl.sh/spin-app-$(uuidgen):1h
spin registry push $IMAGE_NAME

# Scaffold Kubernetes manifests
spin kube scaffold -f $IMAGE_NAME > app.yaml

# Deploy to Kubernetes
kubectl apply -f app.yaml
If you want to try things out yourself, the easiest way is to follow the quickstart guide - we can’t wait to see what you build.
Community
SpinKube on KinD: Rancher Desktop Super Powers
Run SpinKube on KinD thanks to Rancher Desktop Wasm implementation.
The goal of this guide is show a way to bring SpinKube to KinD without the need of a custom image, like the SpinKube on k3d example.
Instead, the Rancher Desktop (RD) Spin plugin will be used alongside KinD cluster configuration.
Finally, this guide will have three major sections covering the following:
- KinD configurations: contains the different configurations, depending on your OS
- RD on WSL: targets only Windows users
- RD on LIMA: targets both Linux and MacOS users
Prerequisites
In order to follow this guide, the following applications need to be installed:
- Rancher Desktop v1.13
- This is the first version with the Spin plugin
- The following preferences are set:
- Preferences > Container Engine
- containerd is selected
- Web Assembly (wasm) is enabled
- Preferences > Kubernetes
- Kubernetes is disabled
- Preferences > Container Engine
- KinD v0.23
- This is the first version with the
nerdctlprovider - If not yet available, you might need to build it (see Bonus 1: build KinD)
- This is the first version with the
Concerning the Kubernetes tooling, Rancher Desktop already covers it.
Connecting the Dots
The reason KinD v0.23 is needed with the nerdctl provider is because the Spin plugin only works on Rancher Desktop when containerd runtime is selected, instead of docker.
If it’s still “obscure”, keep reading and hopefully it will make sense (yes, not yet spoiling how the Spin plugin will be leveraged).
KinD Configurations
This section should clarify how the Spin plugin will be leveraged.
Containerd Configuration File
The first configuration is related to containerd, and more precisely, the one running inside the KinD container(s):
- Create a file in your
$HOMEdirectory calledconfig.toml- You can create it inside a directory, however it still should be located in your
$HOMEdirectory - The location will be important when creating the KinD cluster
- You can create it inside a directory, however it still should be located in your
- Paste the following content inside the
config.tomlfile:
# explicitly use v2 config format
version = 2

[proxy_plugins]
# fuse-overlayfs is used for rootless
[proxy_plugins."fuse-overlayfs"]
  type = "snapshot"
  address = "/run/containerd-fuse-overlayfs.sock"

[plugins."io.containerd.grpc.v1.cri".containerd]
  # save disk space when using a single snapshotter
  discard_unpacked_layers = true
  # explicitly use default snapshotter so we can sed it in entrypoint
  snapshotter = "overlayfs"
  # explicit default here, as we're configuring it below
  default_runtime_name = "runc"
[plugins."io.containerd.grpc.v1.cri".containerd.runtimes.runc]
  # set default runtime handler to v2, which has a per-pod shim
  runtime_type = "io.containerd.runc.v2"
  # Generated by "ctr oci spec" and modified at base container to mount poduct_uuid
  base_runtime_spec = "/etc/containerd/cri-base.json"
  [plugins."io.containerd.grpc.v1.cri".containerd.runtimes.runc.options]
    # use systemd cgroup by default
    SystemdCgroup = true

# Setup a runtime with the magic name ("test-handler") used for Kubernetes
# runtime class tests ...
[plugins."io.containerd.grpc.v1.cri".containerd.runtimes.test-handler]
  # same settings as runc
  runtime_type = "io.containerd.runc.v2"
  base_runtime_spec = "/etc/containerd/cri-base.json"
  [plugins."io.containerd.grpc.v1.cri".containerd.runtimes.test-handler.options]
    SystemdCgroup = true

[plugins."io.containerd.grpc.v1.cri"]
  # use fixed sandbox image
  sandbox_image = "registry.k8s.io/pause:3.7"
  # allow hugepages controller to be missing
  # see https://github.com/containerd/cri/pull/1501
  tolerate_missing_hugepages_controller = true
  # restrict_oom_score_adj needs to be true when running inside UserNS (rootless)
  restrict_oom_score_adj = false

[plugins."io.containerd.grpc.v1.cri".containerd.runtimes.spin]
  runtime_type = "/usr/local/bin/containerd-shim-spin-v2"
NOTE: this file is a copy of the original one that can be found inside the KinD container. The only addition to the file is the declaration of the
spinplugin (the last 2 lines)
KinD Configuration File
The second configuration file is related to KinD and will be used when creating a new cluster:
- Create a file in your
$HOMEdirectory calledkind-spin.yaml(for example)- You can create it inside a directory, however it still should be located in your
$HOMEdirectory - The location will be important when creating the KinD cluster
- You can create it inside a directory, however it still should be located in your
Windows Users ONLY
@"
kind: Cluster
apiVersion: kind.x-k8s.io/v1alpha4
nodes:
- role: control-plane
  extraMounts:
  - hostPath: /root/kind-spin/config.toml
    containerPath: /etc/containerd/config.toml
  - hostPath: /usr/local/containerd-shims/containerd-shim-spin-v2
    containerPath: /usr/local/bin/containerd-shim-spin-v2
"@ | rdctl shell -- tee -a /root/kind-spin.yaml
Linux and MacOS Users ONLY
cat <<EOF > $HOME/kind-spin.yaml
kind: Cluster
apiVersion: kind.x-k8s.io/v1alpha4
nodes:
- role: control-plane
  extraMounts:
  - hostPath: ${HOME}/config.toml
    containerPath: /etc/containerd/config.toml
  - hostPath: /usr/local/containerd-shims/containerd-shim-spin-v2
    containerPath: /usr/local/bin/containerd-shim-spin-v2
EOF
Connecting the Dots (Two)
Rancher Desktop leverages two different technologies depending on the OS its installed.
On Windows, WSL2 will be used and for Linux and MacOS, Lima is the preferred choice.
While both technologies run Linux in a microVM, the behaviors differ in some parts. And the mountpoints with the host system are one of these differences.
In the case of RD on WSL, the file generated is created inside the microVM, as nerdctl will need to have acceess to the file’s path. Technically speaking, the mountpoint /mnt/c could also be used, however sometimes it’s not available due to WSL main configuration. This way should be a bit more generic.
Concerning RD on Lima, $HOME is mounted inside the microVM, therefore nerdctl will already see the files, and there’s not need on copying the files over like it’s done for WSL.
Finally, on both cases, the binary containerd-shim-spin-v2 is already accessible inside the microVMs.
Create KinD Cluster
With all the preparations done, you can now create a new KinD cluster as follows:
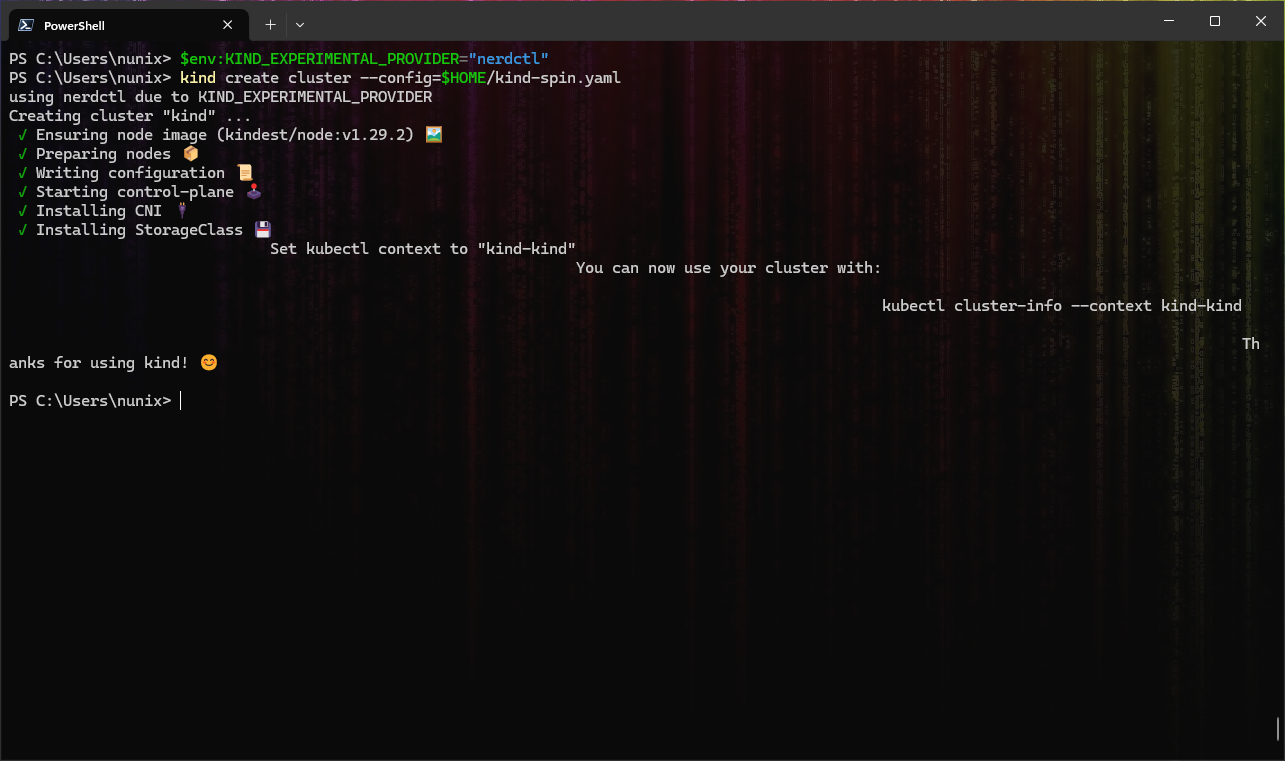
Windows Users ONLY
# Set the KinD provider to nerdctl
$env:KIND_EXPERIMENTAL_PROVIDER="nerdctl"

# Create a new cluster with the config file "kind-spin.yaml"
kind create cluster --config=$HOME/kind-spin.yaml
Linux and MacOS Users ONLY
# Set the KinD provider to nerdctl
export KIND_EXPERIMENTAL_PROVIDER=nerdctl

# Create a new cluster with the config file "kind-spin.yaml"
kind create cluster --config=$HOME/kind-spin.yaml
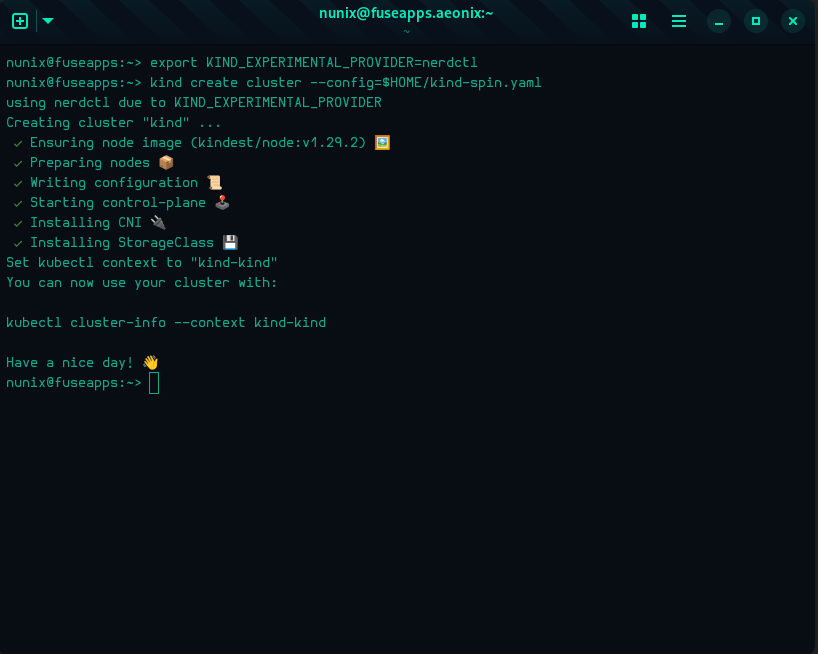
Now that you have a KinD cluster running with the spin plugin enabled for containerd. However, it is not yet used by Kubernetes (runtimeClass). This will be done on the next section.
Deploy SpinKube
From here, you can reference the excellent quickstart to deploy SpinKube for a detailed explanation of each step.
To avoid repetition, and to encourage you to go read the quickstart (and the overall SpinKube docs), the steps below will only include short descriptions:
IMPORTANT: the following commands are “universal”, working on both powershell and bash/zsh. The “multiline characters” have been removed on purpose (` for powershell and \ for bash).
# Install cert-manager
kubectl apply -f https://github.com/cert-manager/cert-manager/releases/download/v1.14.3/cert-manager.yaml

# Install the Runtime Class
kubectl apply -f https://github.com/spinkube/spin-operator/releases/download/v0.1.0/spin-operator.runtime-class.yaml

# Install the CRD
kubectl apply -f https://github.com/spinkube/spin-operator/releases/download/v0.1.0/spin-operator.crds.yaml

# Deploy SpinKube
helm install spin-operator --namespace spin-operator --create-namespace --version 0.1.0 --wait oci://ghcr.io/spinkube/charts/spin-operator

# Install the App Executor
kubectl apply -f https://github.com/spinkube/spin-operator/releases/download/v0.1.0/spin-operator.shim-executor.yaml
SpinKube is now deployed and you can run your first application as described below.
Sample Application
Same as the SpinKube deployment, you can follow the quickstart:
# Deploy the application
kubectl apply -f https://raw.githubusercontent.com/spinkube/spin-operator/main/config/samples/simple.yaml

# Port forwarding
kubectl port-forward svc/simple-spinapp 8083:80

# Open a webpage at http://localhost:8083/hello
## Or use curl
curl localhost:8083/hello

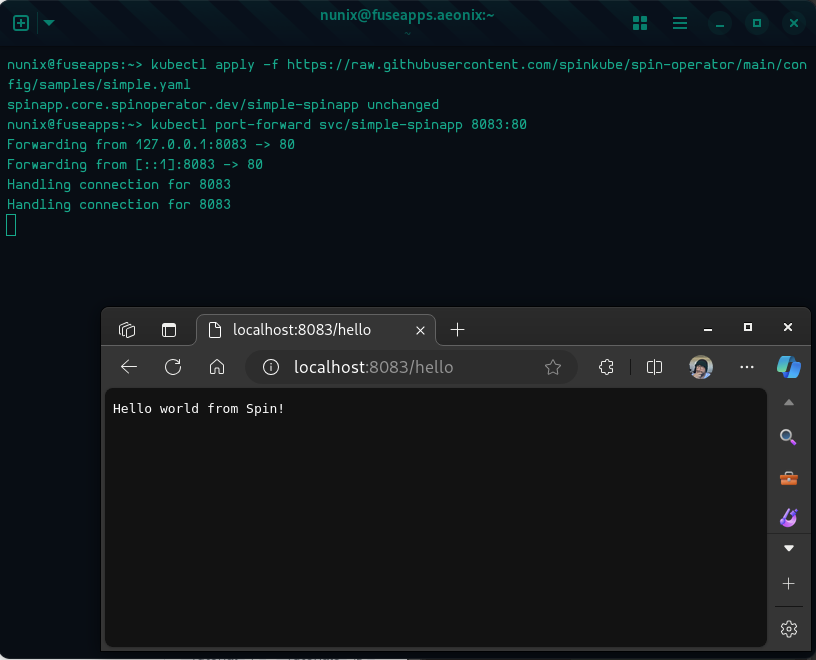
Congratulations! You have a cluster with SpinKube running.
Conclusion
First of all, THANK YOU to all the projects maintainers and contributors! Without you, there wouldn’t be blogs like this one.
Secondly, as you may know or not, this is highly experimental, and the main purpose was more a proof-of-concept rather than a real solution.
Lastly, SpinKube on Rancher Desktop has been tested, both by Fermyon and SUSE, and it’s suggested that you follow this howto for a long-term environment.
Special thanks to Fermyon for hosting this (first) blog on SpinKube and thanks to anyone reaching this last line, you mean the world to me.
>» The Corsair «<
Bonus 1: build KinD
If you need to build the latest version of KinD, you can follow the steps below:
[Optional] Non-intrusive and Containerized Binaries
Assuming you’re already running Rancher Desktop, you can create the “binary shortcuts” as follows:
Windows Users ONLY
# Function for GIT with your Windows user home directory mounted
## The Chainguard image is used for ease of use only
function git { nerdctl run --rm -v ${env:USERPROFILE}:/home/git chainguard/git $args}

# Function for GO with the current directory mounted and the GOOS environment variable set
## The Chainguard image is used for ease of use only
function go { nerdctl run --rm -v ${PWD}:/work -w /work -e GOOS=${env:GOOS} chainguard/go $args }
Linux and MacOS Users ONLY
# Function for GIT with your Linux user home directory mounted
## The Chainguard image is used for ease of use only
alias git='nerdctl run --rm -v $HOME:/home/git chainguard/git'

# Function for GO with the current directory mounted and the GOOS environment variable set
## The Chainguard image is used for ease of use only
alias go='nerdctl run --rm -v $PWD:/work -w /work -e GOOS=$GOOS chainguard/go'
Build KinD
With both the git and go binaries available, you can now build KinD as follows:
Windows Users ONLY
# Clone the KinD repository
git clone https://github.com/kubernetes-sigs/kind.git

# Change to the KinD directory
cd kind

# Build the KinD binary
$env:GOOS="windows"; go build -buildvcs=false -o kind.exe

# Move the binary to a directory in your PATH
mv kind.exe ${env:USERPROFILE}\bin

# Check the KinD version
kind version
Linux and MacOS Users ONLY
# Clone the KinD repository
git clone https://github.com/kubernetes-sigs/kind.git

# Change to the KinD directory
cd kind

# Build the KinD binary
go build -buildvcs=false -o kind

# Move the binary to a directory in your PATH
sudo mv kind /usr/local/bin

# Check the KinD version
kind version